 Planning…Planning…
Planning is where you start to bring all your ideas together. This step is probably the longest so a road map is in order.
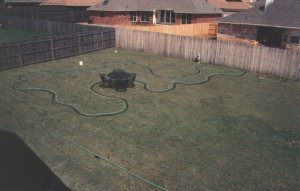
I started my road map with a picture of site. I took it to the local Kinkos and got several color enlargement copies made on one of their color copiers. This was much cheaper than getting actual photo copies made at the camera shop. With these, I could sketch things out. Actually, I started drawing on the photos before my Kinko's brainstorm and you can see the results of lots of erasures. Also the holes where it went into my pond binder. See the line on the fence where I was planning for dirt? You can also see in this picture one of the most important tools you will use at this stage - a garden hose! I know, you don't have anything to fill yet, but trust me, you can use your hose to lay out all sorts of shapes. I'd mow the lawn in the area sorta short and make a few tries at pond shapes. When I got a shape I liked, I spray painted around the hose so the design would stay around a little and also show up on photos better. I would cogitate on this design a little, play with a little lawn furniture, put a few pots around to represent major plants and trees, and then try something else.
The other thing you want to do at this stage, BEFORE YOU TRY TO DECIDE WHERE YOUR POND WILL GO, FIND OUT ABOUT ANY BURIED UTILITIES!!! Most localities and utilities will have a free service where you can call them up and they will come out and mark your lawn wherever your buried gas, electric, phone, cable, water and other lines are. This is REALLY important. A person in my area was killed digging a pond when he hit a buried power line. In my area, there is a single company that will come out and check for ALL the utilities, spraying the yard with a different color paint for each utility. This is good, because in my area, I can be charged with a crime if I bust a utility, not to mention having to pay the costs of the repair. You can have some of these things moved, but it will increase the cost of your pond...
Make a detailed scale drawing of your yard. You can do the job by hand, or you can pick up one of the many landscaping software packages that are available. If you get one that has symbols for drainage pipes and sprinkler systems, that will help you with your plumbing and electric layout. Be sure that this drawing has your utility locations, buried and overhead...
Once you have your existing layout down, you can start to experiment with placement of all the things that will be in your system. This is how my planning process went.
My ideas when I started this whole mess were that I wanted a waterfall and 2 ponds connected by a stream. Very informal. I also wanted a little bridge over the stream. I decided where to put it in the yard by digging a few test holes to see how stiff the dirt was. I wanted to spend as little on unnecessary stuff as possible so I knew I was keeping the dirt rather than having it hauled off. I had to put the pond away from the fences to accommodate city easements and thought that I could put the dirt between the pond and the fence to make a hill for a backdrop to the pond.
The pump/s and liner are probably the most expensive items you will buy for your pond unless you also buy rocks or a commercial filter but more on those things later. With that in mind, I went to the Lilyponds catalog and used their liner chart for liner/pond sizes and compared this with the pump chart. My research and the general feeling at the time was that you needed to circulate 1/4 the volume of your pond thru a filter every hour. I also wanted to make sure I had enough pump volume to supply a decent depth for my stream. I settled on a 20 by 30 liner for my main pond and a 3400 gallons per hour pump. Overkill on the pump, but I wanted waterfall noise and stream depth and I could split the output of the pump between the filter and the waterfall.
Since I live in Texas, and I wanted koi, I wanted my pond to deeper than 18 inches. Looking at the catalogs, many of the plants I wanted were tropical and I thought I could over-winter those plants on the bottom of the pond if it were deep enough. But I didn't want it too deep. I knew I would have to get in the pond when the water temperature was not at it's best to get the plants ready for winter and spring. With this thought, I settled on a depth of 32 inches, my inseam measurement, for most of the pond, with a 36 inch section for the pump.
Most of the catalogs will give you a formula to calculate you liner size when you know your pond size, but I wanted to make the most out of the liner I could afford so I worked backwards. I doubled the depth and added doubled 18 inches to take care of my edging to hide the liner. This gives me about 7 feet. Subtract that from my liner size and I get a pond with maximum dimensions of 13 by 23 feet. For this size, the closest I could get to the fence and not have a huge hill was 10 feet. That would give me a rough hill height of about 2 feet. Any higher and I would annoy the neighbors when I went up there!
I now had something to work with. A basic size and some placement points. See how things start to come together. Now I got to planning shape. I had a few books and my pictures and started laying out garden hose. My first stabs were real complicated shapes, thinking that that is the way nature did it. I settled on the shape you see in the picture above. And started thinking about filtration.
I would like to digress here a moment. POND FILTERS ARE TOO EXPENSIVE! There, I said it! I figured with the big pond, the little pond, the stream... I was talking about over 6000 gallons of pond water to filter! The filters that are on the market today for a pond that size cost more than the liner, WAY more! Manufactured filters for my pond would cost me over $1000! AND THAT'S FOR THE CHEAP ONES! Filters aren't complicated and don't require a bunch of high-tech stuff. Biological filtration is just a box that your run your water thru that has some kind of material in it that bacteria can grow on and eat the junk in your water. WE'RE NOT TALKING ROCKET SCIENCE MANUFACTURERS SO QUIT CHARGING LIKE IT IS!!!!!!
There, I feel better. But you also know why I and almost everyone else I know built their filter rather than buy one. First, why filter? I want to have fish and plants. I also want to have clear water. If these are your goals, some sort of filtration is necessary. There are 2 types of filtration, mechanical and biological. Mechanical filtration serves to remove the "hunks" out of your water, usually using a sponge or matting. These are used to keep the junk from clogging your pump and are usually at the inlet of your pump. Mechanical filtration can also be something as simple as a settling pond. This is an area where moving water slows enough for the "floaties" to sink to the bottom where they can be scooped out.
Biological filtration works on a different level. If you have fish in a pond, you have fish "by-products". Fish waste is composed of ammonia and nitrites, both of which will kill fish. Bacteria exists in the water that will convert these nasties into nitrates, fertilizer. Unfortunately, our ponds are not build to contain enough of these critters to do the complete job. A biological filter is designed to make a home for enough of them to grow and multiply and do their job. They grow on the surface of things and "eat" the stuff in the water as it passes by. And that's all a bio-filter is! You'll see all kinds of fancy things on a filter, but the real working guts is a box with an inlet and an outlet and something inside with lots of surface area where bacteria can grow. Here is a basic design that I stole out of the Lilyponds catalog and adapted for my pond:
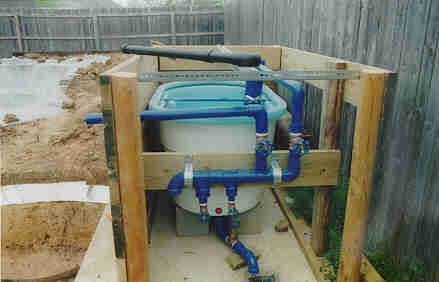
Side view of the filter above. Notice pump outlets. Clockwise, the top right one supplies the filter, the bottom right attaches to a hose and nozzle to clean the filter, bottom left will supply a future small stream, top left is waterfall supply for any volume that is left over. The black pope on top is a manifold to attach to the waterfall supply to spread out the water behind the waterfall rocks.
This filter is huge and only cost me about $250 for parts! The water enters the aeration tower (PVC pipe) at the top and flows out holes in the bottom of the tower. The filter media is sitting on some of that florescent lighting fixture grid stuff that is plastic with little 1/4 inch squares. I cut it to shape and supported it with a few bricks. I used to say the filter material is anything with lots of surface area - plastic hair curlers, rings of PVC pipe, tubing, sponge, air filter matting, anything that will let water freely pass. THIS IS WRONG!!! These materials can flake off bits or dissolve and kill your fish. And for goodness sake, do NOT use gravel or lava rock! All these materials are very expensive in the long run since you have to keep replacing them and are very difficult to clean as well. Please do yourself a favor and go with a good commercial filter material like bioballs or bioribbon. You can buy both in bulk and can probably get the bioribbon at your local pond shop. It's fairly cheap as one $40 box will do a 50 gallon filter. Bioballs are a little more expensive but do a better job. The water flows up thru this stuff and out a hole in the side at the top. This can be another pipe to your pond or flowing out as part of a waterfall as I did.
I have heard people say that they don't filter because they want a "natural" pond. Think of all the stuff that is in a clear natural pond or stream that bacteria can grow on. Yes, Virginia, even Mother Nature uses biological filtration.
I've also had lots of requests to provide plumbing information. Actually, this is really an impossible task. You see, everyone's pond is different. In fact, I have 2 ponds and neither of them is plumbed the same way. All you have to do is figure out where you want your filter and where you're putting your pump, as well as what kind of pump. Sketch it out on paper. If you're also doing a waterfall, plan on splitting the outflow from the pump, one line to the filter and another to the waterfall, or use 2 pumps. If you're building your own filter, start with that. Get the tub and then figure out how you're gonna get the water to the bottom of the container and then how you're gonna get it out. Go to the hardware store and start assembling parts as you're standing at the parts bins. Plan on making a bunch of trips and maybe getting some things wrong or having to redo something. After you know your plumbing sizes, filter, pump, etc, figure out the run from the pump to the waterfall and filter. Be sure to isolate all the fixtures with unions so that you can make repairs and replacements.
There are a few differences when you use an external pump versus an internal/submerged pump. With that in mind, I did up a little drawing for an external pump installation and also show a barrel-type biofilter. As you can see, the barrel filter is pretty much the same as the first filter I showed. Proof that the filters are all the same, the only difference is in the container. One of the differences is that you need to worry about what happens when the electricity goes out. External pumps need to have air free lines from the water to the pump. This is a "prime". If the pump loses it's prime, it will just try to suck air and eventually burn up. To allow a pump to keep it's prime, you can do 2 things. First, you can install your pump below the pond waterlevel either downhill or in an in-ground dry box next to the pond. The other thing is to install a priming pot and check valve. The check valve keeps water from running back into the pond. The priming pot keeps a volume of water always at the pump impeller. Take a look at the picture and things will be a little clearer...
The big details were planned. I planned to think on the little details as I dug. Here is what I finally got down on paper. You'll notice that it is a little different from what I planned. Well, you know what they say about the best laid plans mice and men…. I took "She Who Must be Obeyed" to one of the seminars I had been attending and she won the door prize - a Charlene Strawn already getting ready to bloom in just a few days! There was no way I could get that sucker dug in a short time, so we left the seminar with one of those Tetra pond kits for a 6 by 8 x 2 feet deep pond. Now what to do? I stared at the yard and found another location, quickly did a basic simple design and started digging while the lily lived in the upstairs bath tub!
Got it in that weekend and had blooms in 4 days! It wasn't my grand
design, but boy it was really a blessing in disguise as I learned LOTS!
More on that stuff in the Building
section. I didn't give up on my big pond, just postponed it a little.
Here are a couple of examples of my own planning. I got a little bored during the winter while planning my big ponds and did a couple of drawings. The drawings helped a lot of my planning even though they didn't keep me from making a few mistakes... But I thought I'd add these drawings because a lot of people send me notes about overflows, my hill, the rings and the concrete blocks. By the way, I don't use concrete blocks any longer to support my shelves and plants. Instead I've built small stands out of PVC pipe. I add sand to them to before gluing the last connection tokeep them from floating and drill a couple of holes drilled afterwards to let the air out. One of these days I'll have to put up some pictures.
This is the mistake. Here's my drawing of my waterfall/settlement pond/stream/main pond. As you can see, it doesn't look too bad trying to hide the filter with the waterfall. What it doesn't show, is just how massive all the rocks above the water outlet are. Oh well, live and learn.
If you have any questions, shoot me an e-mail at:
 Back
to the Start?
Back
to the Start?