 Building...
.
Building...
.
The actual building of a pond is not really difficult. If you've done your
Research... and
Planning..., the
hard part is over. This part used to walk you thru the steps like the books
do. You've seen this method also in the flyers, that pond kit you may have
bought the first time, and even some videos. Step 1 - Lay out the shape.
Step 2 - Dig and level the pond. Step 3 - Lay in the liner and fill it
up. Step 4 - set your edging and fill it with fish and plants. But you
will no sooner get this done than you will start to realize that some of
the advise you get in those simple steps is wrong, and that there are other
things you could've done if you had really known, but it is too late now.
 Step 1.
 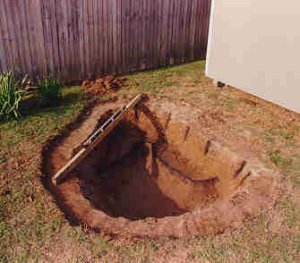 Step 2.
 Step 3.
 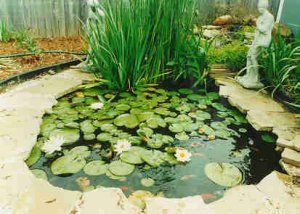 Step 4.
If you've read the Research...,
Planning..., Tips...,
and Other Stuff...
pages, you've already seen some of those things. We will now take you thru
the more up-to-date method to build a water garden that you'll be happier
with and that will also be easier to take care of. There are lots more
options you can add to your pond, such as skimmers, automatic fill valves,
edging options bottom drains, and so forth that I won't get into. Finding
all those things is the main reason for spending so much time in the other
steps of Research and Planning. These steps will give you the time to research and think about thich
options are right for you and your site. Besides, there are so many new
things coming out every day that there is no way I could keep up with them,
update this page and still be able to do right by She Who Must Be Obeyed!!!
What are a few of the things that are WRONG with the old instructions?
The plant shelves. Nix them. They aren't necessary. They DO deteriorate
as the edges crumble to the bottom. And they limit your plant placement
to decisions you made when you dug your pond. You can replace the dirt
shelves with a few stands made from pvc pipe or bricks and a couple of 2x8's. This
gives you more water volume, a place for the fish to hide and you can move
and re-arrange them whenever you want. You won't use any more or less liner,
but you WILL find that the liner is MUCH easier to lay!!!
Nix the sand on the sides, you can't keep it where it belongs. If you have
REALLY rocky soil, use newspapers or old TACK FREE carpet. You can also
get the rubber liner with a geotextile material bonded to it. If you can
use that AND sand, all the better.
Size is another of the old things that we now do better. See, we've learned over
the years that bigger REALLY IS better. A lot of the focus is to a pond that is
easier to take care of. If your pond is of a size that you can actually get into,
you'll find that you're able to take care of your plants at waist level rather than bending
over from the edging. You'll also find that you have more room around the bottom to
move a pool scoop to clean the bottom. And a deeper pond also will mean fewer problems.
So, what I'm getting at and will stress more and more, BIGGER IS BETTER!!! I don't
recommend ponds any smaller than 8x10 if there's room for it and I don't recommend ponds
any shallower than 30 inches. Also, if you're planning on keeping koi in your pond, they
prefer a bigger pond. For koi, plan on a pond of at least 1500 gallons, which just happens
to be a 10x8x2.5 pond...
Last, edging is the way to cover the liner to block UV, transition from
water to lawn, and, most important, keep water from moving under the liner
during a rain. Lots of people use flagstone edging. There's nothing wrong
with it, it's quick and durable, it just doesn't look too natural. The
problem is that most of the older books don't show you many different ways
to hide the edge of your liner. When you buy books, look for some that
give you some different options. Helen Nash's "The Complete Pond Builder"
has one of the best selections of edging options with drawings on how to
build them. You can also see a bunch of options in place, on the "tours"
pages on the North Texas Water Garden Society.
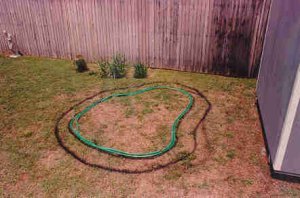
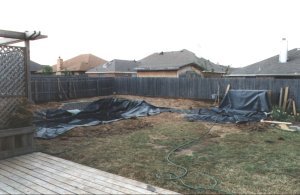
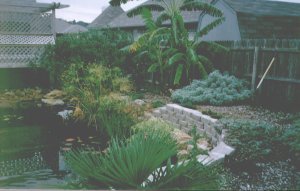
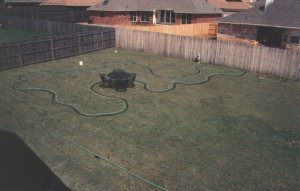 So let's
take another look at the building process. Start at your yard. This is
the picture you have been looking at for months or at least last week think
and planning your new pond. Actually, you will have been looking at a picture
of YOUR pond, but you get the idea. Take a look at several layouts with
our hose. Several things are in consideration here. We are planning a larger
pond. We have made plans to hide a filter large enough for this pond behind
a waterfall. (This was not a good decision, but is one that will be corrected
this spring or next that I will talk about later.) There is also a nice
stream here to allow for a bridge. One of the things I thought about was
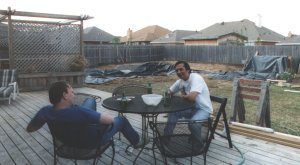
having a place that I could place a table and chairs for maybe some card
games overlooking the pond. I also started some intermediate planning for
trees and other major plants, note the buckets. And I've laid out for a
new deck with an additional hose.
So let's
take another look at the building process. Start at your yard. This is
the picture you have been looking at for months or at least last week think
and planning your new pond. Actually, you will have been looking at a picture
of YOUR pond, but you get the idea. Take a look at several layouts with
our hose. Several things are in consideration here. We are planning a larger
pond. We have made plans to hide a filter large enough for this pond behind
a waterfall. (This was not a good decision, but is one that will be corrected
this spring or next that I will talk about later.) There is also a nice
stream here to allow for a bridge. One of the things I thought about was
having a place that I could place a table and chairs for maybe some card
games overlooking the pond. I also started some intermediate planning for
trees and other major plants, note the buckets. And I've laid out for a
new deck with an additional hose.
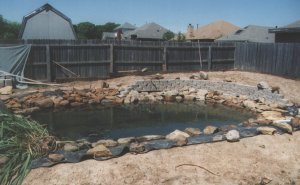
Construction has started. 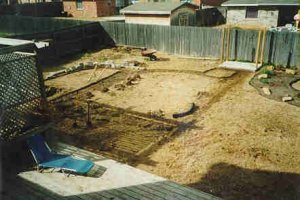 A
few things to note. This is about 2 years after the last slide. First note
the simpler shape of the main pond. A little thinking revealed that if
I used only one pump, there would be some areas where no water flowed,
leaving dead spots. The more complex shape also seemed it would be harder
to dig. And lastly, the simpler shape made for a larger pond, volume-wise,
without using a larger liner or wasting liner. A personal decision. A concrete
support pad for the filter/waterfall has been poured. This kind of support
is needed for large accumulations of rocks to keep them from settling.
A new pond has been added in front of this pad. This pond is really an
addition to the filtration system. It's a settlement pond. It'll allow
any particles not captured by the filter to be collected here. It also
allows for a place to put the oxygenating plants that are so tempting and
are usually eaten by your fish. Another addition. There is 4 inch drain
pipe running from the filter all the way to the street. Pond overflow pipes
are also connected to this as are a couple of yard drains. While I was
at it, I connected the gutter downspouts to it. Excess water ends up there,
not flooding the yard. Also, note a labor saving device in the left center
of the picture. This is a manual sod kicker. It's used to scrape the sod
off the dirt. It rents for $10 a day and all the sod for this project was
removed in 4 hours of moderate work and one 6-pack of Dos Equis. There
are block/railroad tie walls at the back of the pond to hold the dirt to
make a nice 2.5 foot hill. Lastly. There was a lot of dirt moved here and
I did it all myself. The trick was learned from the first pond... patience.
I set up myself some goals. I would dig every day it was not raining. On
week days, I had a goal of 3 wheel barrows of dirt, 5 on the weekend. It
usually ended up as 5 and 10, but it was not too much work broken up that
way.
A
few things to note. This is about 2 years after the last slide. First note
the simpler shape of the main pond. A little thinking revealed that if
I used only one pump, there would be some areas where no water flowed,
leaving dead spots. The more complex shape also seemed it would be harder
to dig. And lastly, the simpler shape made for a larger pond, volume-wise,
without using a larger liner or wasting liner. A personal decision. A concrete
support pad for the filter/waterfall has been poured. This kind of support
is needed for large accumulations of rocks to keep them from settling.
A new pond has been added in front of this pad. This pond is really an
addition to the filtration system. It's a settlement pond. It'll allow
any particles not captured by the filter to be collected here. It also
allows for a place to put the oxygenating plants that are so tempting and
are usually eaten by your fish. Another addition. There is 4 inch drain
pipe running from the filter all the way to the street. Pond overflow pipes
are also connected to this as are a couple of yard drains. While I was
at it, I connected the gutter downspouts to it. Excess water ends up there,
not flooding the yard. Also, note a labor saving device in the left center
of the picture. This is a manual sod kicker. It's used to scrape the sod
off the dirt. It rents for $10 a day and all the sod for this project was
removed in 4 hours of moderate work and one 6-pack of Dos Equis. There
are block/railroad tie walls at the back of the pond to hold the dirt to
make a nice 2.5 foot hill. Lastly. There was a lot of dirt moved here and
I did it all myself. The trick was learned from the first pond... patience.
I set up myself some goals. I would dig every day it was not raining. On
week days, I had a goal of 3 wheel barrows of dirt, 5 on the weekend. It
usually ended up as 5 and 10, but it was not too much work broken up that
way.
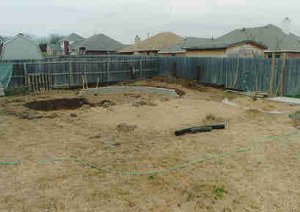 Digging
continues. The wall progresses. Note I am using concrete wall stones next
to the pond and railroad ties against the fence. Creosote will kill your
fish so keep them away from the water. This is about 2 weeks of digging
due to a little rain that required draining. The sand pile is on the small
pond. I use this sand constantly. As digging went, I put down a 2 inch
layer of BUILDERS' SAND in the bottom. This stuff is great, much better
than play sand or river sand. It's cheap, it packs firm, dries out fast
and does not stick to your shoes to please She Who Must Be Obeyed.
Digging
continues. The wall progresses. Note I am using concrete wall stones next
to the pond and railroad ties against the fence. Creosote will kill your
fish so keep them away from the water. This is about 2 weeks of digging
due to a little rain that required draining. The sand pile is on the small
pond. I use this sand constantly. As digging went, I put down a 2 inch
layer of BUILDERS' SAND in the bottom. This stuff is great, much better
than play sand or river sand. It's cheap, it packs firm, dries out fast
and does not stick to your shoes to please She Who Must Be Obeyed.
The wall is finished and there is a "trough" behind it to route
the water away from the pond.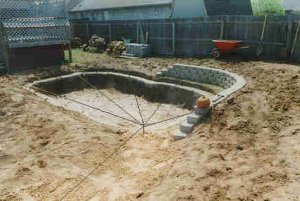 The whole thing has been leveled from this stake using a mason's line level.
The bottom line runs up the stream to make sure the stream runs DOWN to
the pond. Laugh, but it's the obvious stuff that will reach up and bite
your ass or camel. (that's not a pumpkin on the wall, but a ball of twine)
Always level your pond edges all points from one common point. I know a
person who put in a small pond, checked the level length wise and again
cross-wise and they were perfect. Dropped in the liner and installed the
edging and then discovered that although they were level each direction,
they were out of level with each other by 2 inches!!! If you use a hard
liner or flagstone edging, your entire pond must be level to within a half
an inch or it will really look goofy. That's one of the benefits of a submerged
edging, level is not AS critical... There is also a concrete ring BELOW water
level to support the rock edging. Below grade REALLY hides the liner.
The whole thing has been leveled from this stake using a mason's line level.
The bottom line runs up the stream to make sure the stream runs DOWN to
the pond. Laugh, but it's the obvious stuff that will reach up and bite
your ass or camel. (that's not a pumpkin on the wall, but a ball of twine)
Always level your pond edges all points from one common point. I know a
person who put in a small pond, checked the level length wise and again
cross-wise and they were perfect. Dropped in the liner and installed the
edging and then discovered that although they were level each direction,
they were out of level with each other by 2 inches!!! If you use a hard
liner or flagstone edging, your entire pond must be level to within a half
an inch or it will really look goofy. That's one of the benefits of a submerged
edging, level is not AS critical... There is also a concrete ring BELOW water
level to support the rock edging. Below grade REALLY hides the liner.
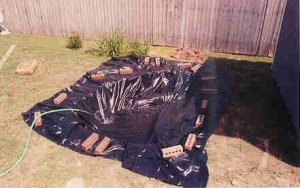
 Setting
the liner. To help eliminate leaks, 3 pieces of liner have been glued together
on the flat ground and moved as one piece into the ponds. They were initially
laid, marked and then removed and glued. This gluing HAS to be done with
the liners flat. There are 2 different ways to join EDPM liners. One method
entails using a contact cement made for this purpose. Be careful with this
stuff, it is hard to get off and it also floats so be careful using it
to tack down pieces of liner while standing in your pond. You will have
to shave your legs to get it off. Then again, SWMBO may like that... The
other method is to use a double stick sealing tape. This is also made for
the purpose. It is not cheap and makes a chemical bond with the rubber.
Since I'm a belt and suspenders kind of guy, I used both.
Setting
the liner. To help eliminate leaks, 3 pieces of liner have been glued together
on the flat ground and moved as one piece into the ponds. They were initially
laid, marked and then removed and glued. This gluing HAS to be done with
the liners flat. There are 2 different ways to join EDPM liners. One method
entails using a contact cement made for this purpose. Be careful with this
stuff, it is hard to get off and it also floats so be careful using it
to tack down pieces of liner while standing in your pond. You will have
to shave your legs to get it off. Then again, SWMBO may like that... The
other method is to use a double stick sealing tape. This is also made for
the purpose. It is not cheap and makes a chemical bond with the rubber.
Since I'm a belt and suspenders kind of guy, I used both.
 The liner
was huge and heavy, over 800 pounds!. I was able to talk to the neighbors
for the loan of backs, hoses and water... How? KEG PARTY!!! These are the
only guys who would sit still for the photo and beer and burgers were only
available AFTER the liners were set for encouragement.
The liner
was huge and heavy, over 800 pounds!. I was able to talk to the neighbors
for the loan of backs, hoses and water... How? KEG PARTY!!! These are the
only guys who would sit still for the photo and beer and burgers were only
available AFTER the liners were set for encouragement.
 After the
liner is in, the filling begins. It may take awhile. I had 3 hoses and
it took 9 hours for mine! I then transferred some plants from my small
pond to kind of kick start the water and also started to lay the edging.
I placed large rocks and then spread gravel around them. The best edging
uses several different sizes of rocks.
After the
liner is in, the filling begins. It may take awhile. I had 3 hoses and
it took 9 hours for mine! I then transferred some plants from my small
pond to kind of kick start the water and also started to lay the edging.
I placed large rocks and then spread gravel around them. The best edging
uses several different sizes of rocks.
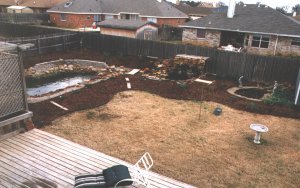
The first picture is right after the installation. The second picture is
a year later. It's not finished, no pond really is, but it is quite enjoyable...
I spend many a night up on my hill enjoying a good book and listening to
the crickets and the waterfall.
Be sure to check the Tips
page after reading this to see some better alternatives to some of these
steps. You have your pictures and your pond layout. Get out the hose and
some spray paint and lay out your design, measuring carefully. It's a real
bummer to do all that digging only to find out you mis-measured and the
hole is bigger than your liner.
And lastly, Momma told you that you would be using your math and you surely
will here. First. How do your calculate your liner size? The formula is
simple. Pretend your liner is a rectangle and use the following formula:
Length = Length of rectangle + (2 * max. depth) + (2 * edge allowance)
Width = Width of rectangle + (2 * maximum depth) + (2 * edge allowance)
You need to have the surface area of your pond to figure out how many plants
you need. Ponds can be really oddball shapes but the best way is to break
the shape down to some basic geometric shapes.
Rectangle or Square: Length x Width
Circular: 1/2 diameter x 1/2 diameter x 3.14
Oval: 1/2 length x 1/2 width x 3.14
You need the volume for pump size and chemicals and so forth. While doing
this, bear in mind that there are 7.5 gallons in every cubic foot.
Rectangle or Square: Length x Width x Average Depth x 7.5
Circular: 1/2 diameter x 1/2 diameter x 3.14 x Average Depth x 7.5
Oval: 1/2 length x 1/2 width x 3.14 x Average Depth x 7.5
Good luck...
If you have any questions, shoot me an e-mail at:
pondguy@pondrushes.net
 Back to the Start?
Copyright 1995-2003 Chuck Rush
Last Updated 03/07/03